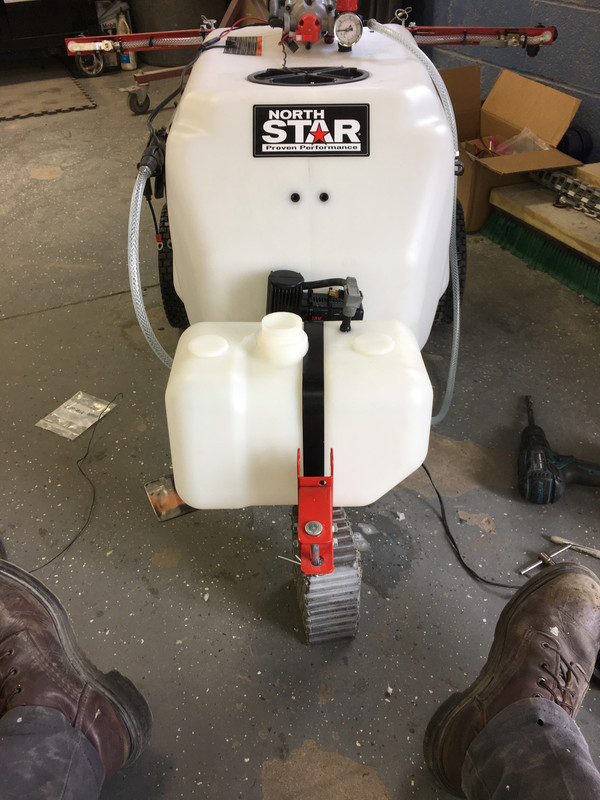
As my lawn obsession has continually grown, it became obvious I needed to upgrade my Sprayers Plus backpack sprayer. Don't get me wrong, Sprayers Plus makes a wonderful sprayer, I just needed a unit that had more capacity, a boom for a wider spray swath, and anything that didn't require my back muscles to tote. I knew the Northstar 31 gallon tow behind sprayer was a solid choice at an affordable price point. I bought one, assembled it and immediately devised a plan to improve on its weak points. You know, just some necessary upgrades. I can't help but channel my inner Tim the Tool man Taylor when I say that!
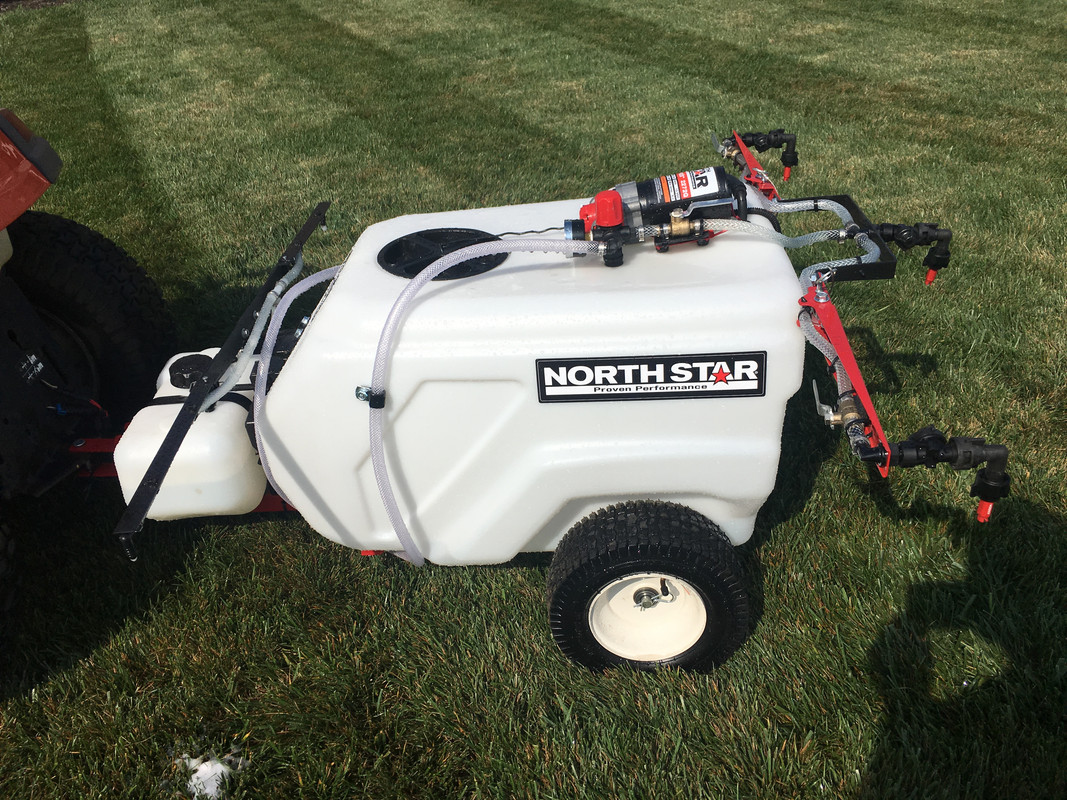
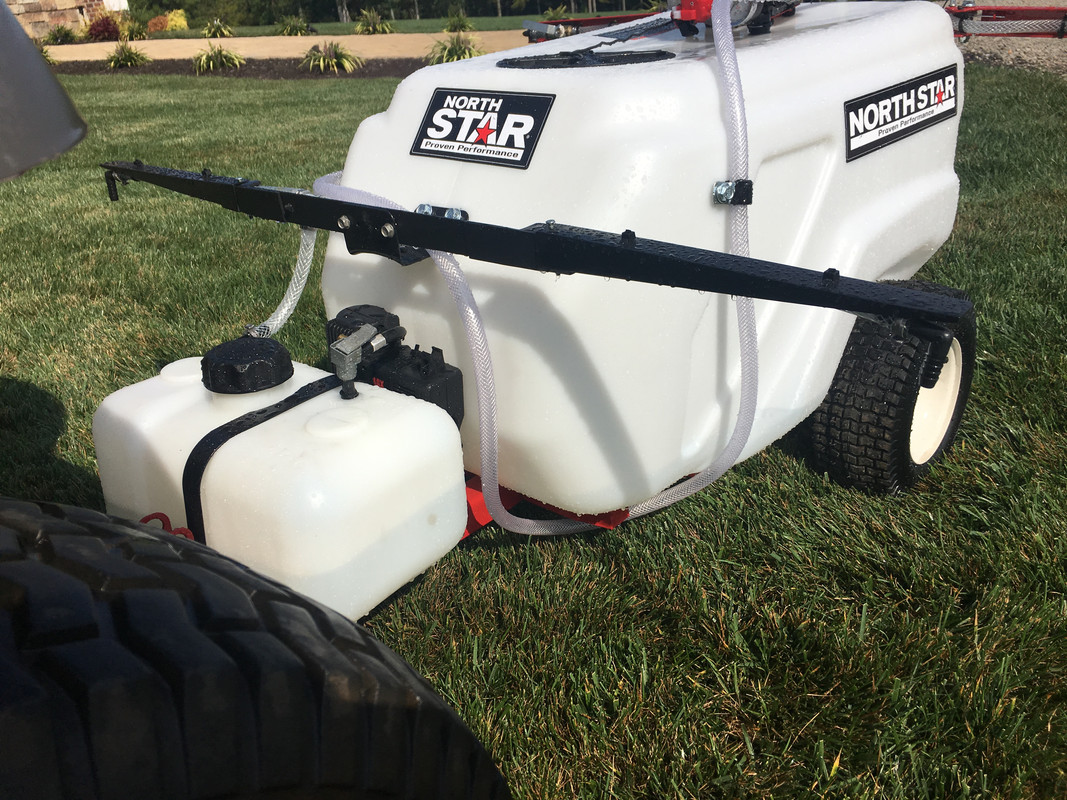
Step One: Shut Off Valve The plastic dinky shut off valves that come on the sprayer required entirely too much effort to open and close. The lever to operate the valve was way to small and hard to get a grip on. Not to mention, the valves looked like they would fall apart if you sneezed on them. I chose to replace them with a 1/2 inch pex ball valve made by Sharkbite, available at any big box store. These valves seemed substantial equipped with an appropriate sized handle. With enough force and I do mean force, you could get the factory 3/8 inch hose to seat on the 1/2 pex barbed fitting. While I was at it, I decided to add a third shut off valve immediately after the pump. This would allow me to turn the boom completely off, utilizing the by pass regulator for tank agitation.
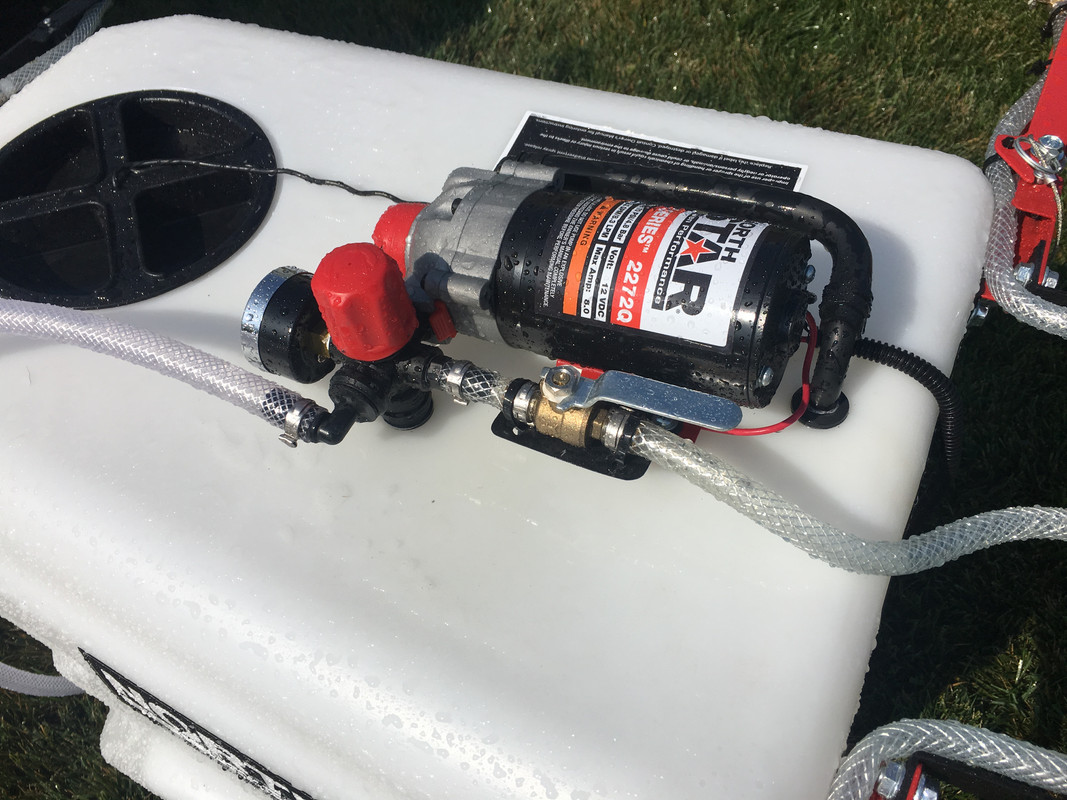
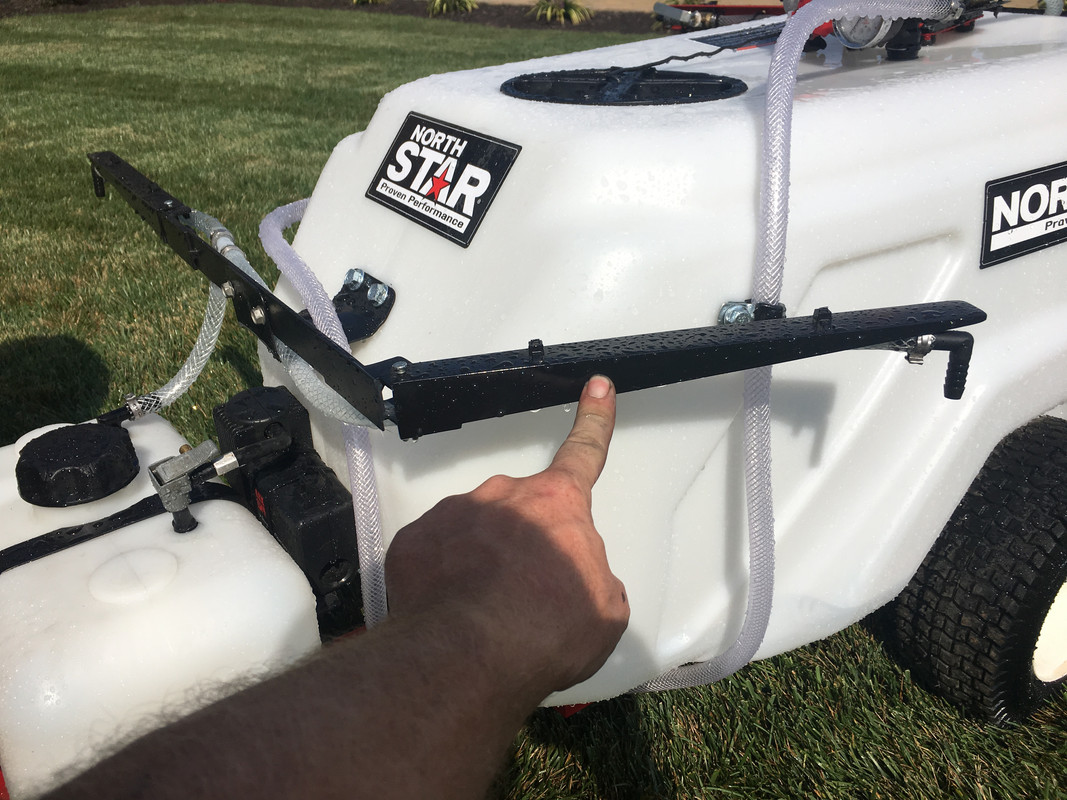
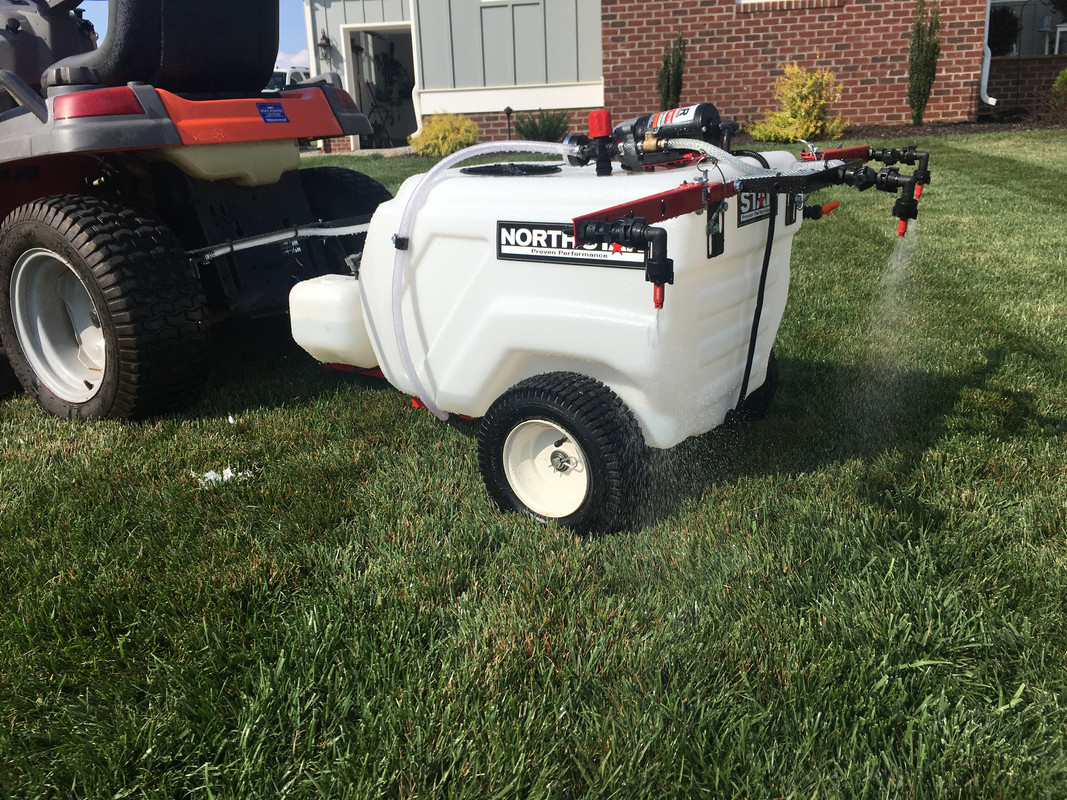
Step Two: TeeJet Upgrade I honestly didn't give the factory spray nozzles on the Northstar a chance. To me it wasn't worth trying to familiarize myself with a new spray pattern and output. I use TeeJet nozzles on my Sprayers Plus backpack, I'm familiar with their spray tips and nozzle bodies. They make an exceptional product backed up by an equally incredible performance chart. Following their 20 inch on center spray tip spacing recommendation, I knew I needed to add a third spray tip in the center of the sprayer. The only issue here being there is no place to mount a third spray nozzle body assembly. I needed to modify the sprayer but I didn't want to lose the factory appearance.
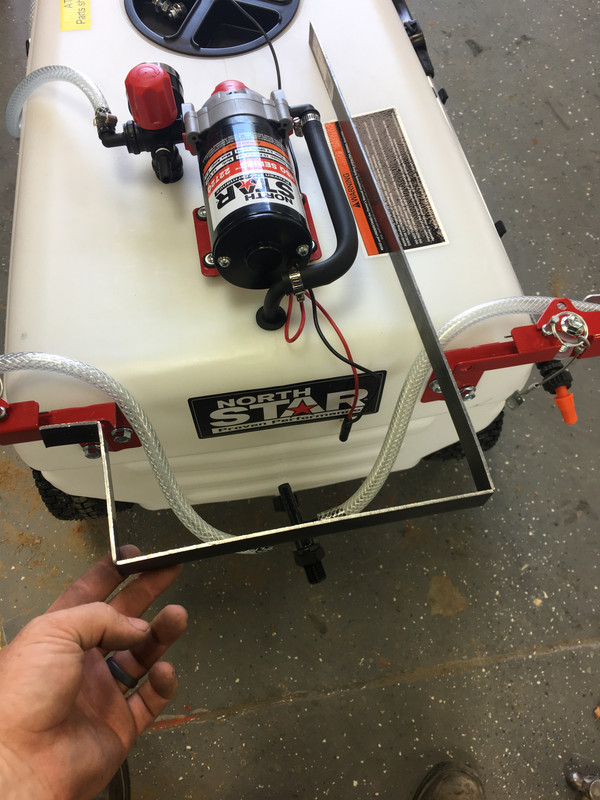
Step Two B: "Boom Extension" I decided to build a boom extension that would span the gap between the two independent spray boom arms. This way the outside boom arms are still fold-able and function as they should. I built the boom extension using a piece of 1 inch wide by 3 foot long metal flat stock. I wanted to offset the middle nozzle so the spray from this tip wouldn't collide with the spray from the adjacent tips. I decided a three inch offset would suffice. A few quick measurements, a couple relief cuts on the back side and a vice for clamping and bending is all it took. Shazam a boom extension! I selected a hose shank nozzle body with triple connection to add the third spray tip. From there, a TeeJet 11/16 inch thread adapter. I needed to turn the orientation 90 degrees downward, I accomplished this using a TeeJet 90 degree elbow adapter. And to finish off the equation, an Air Induction TeeJet Flat Tip enclosed by TeeJet quick Cap and Seat Gasket. I bought a few different tips and cap combos (XR11004VP, XRC1104VP & XRC11006VP). This gives me the flexibility to adjust spray volume up or down, and adjust droplet size in order to control drift. For the two outside spray nozzles everything is the same, it just starts with a TeeJet Shank Hose connection instead of the triple shank used in the middle.

Step Three: Hose Clamps Over the years I have developed a hatred for hose clamps. They function perfectly well, they just look unsightly to me. I had to get rid of them. I decided to replace every single one of them with 1/2 inch pex crimp ring. Nothing significant here but I sleep better at night knowing I don't have any hose clamps on my sprayer.
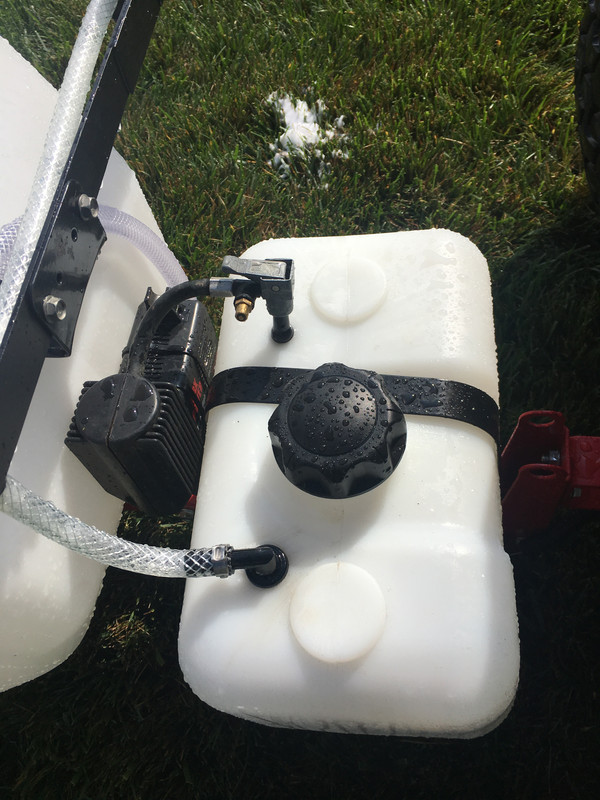
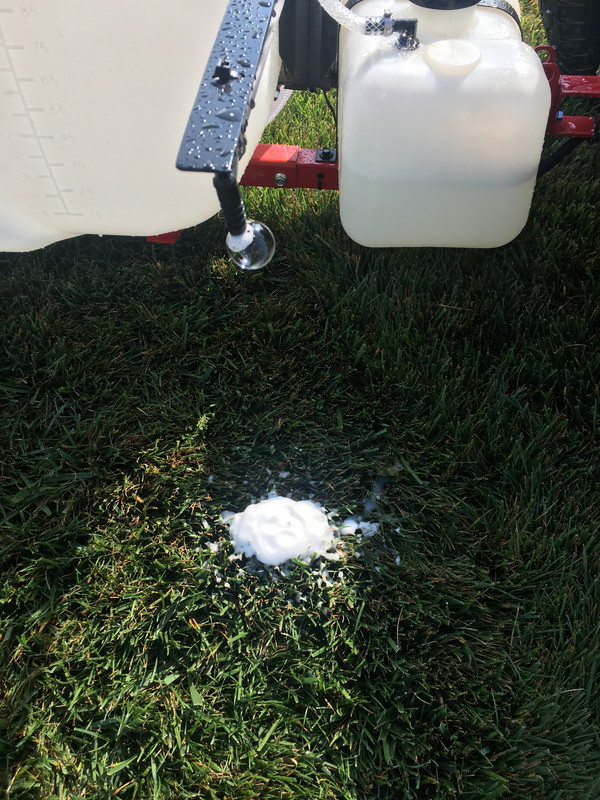
Step Four: Foam Marker Could I use the tires of the lawn mower and the stripes in the grass to monitor where I have sprayed? Probably so, but I like to be a little more precise than that. Lets outfit this sprayer with a foam marker. After a few measurements and calculations, I located a 2.5 gallon tank on usplastic.com. Two things to note here, one being the tank doesn't come with a cap so you'll have to order that separately, come on guys really, but alright. Two, they offer a metal mounting strap as an accessory, makes securing the tank super easy so i'll give them a pat on the back for that. The tank fits rather well on the tongue of the sprayer located directly in front of the 31 gallon tank. I simply drilled and tapped a couple of holes and mounted it. I had a mini air compressor that came in a roadside emergency kit, this should work perfectly as an air source. I mounted that on a bracket between the foam marker tank and the sprayer tank. To connect the air compressor to the tank I used a basic valve stem. I drilled an appropriately sized hole and pulled the valve stem through from the inside of the tank. Before seating the valve stem in the tank, you must attach a piece of hose to get the air from the valve stem down into the water at the bottom of the tank. I just used a piece of windshield washer hose that I had laying around, any small pipe or tubing will work though. Lastly, to get the soapy foam out, I used the same TeeJet Shank hose connection that I used for the sprayer boom arms. This is probably the trickiest part because you have to thread the nut on the hose shank after its inserted into the tank. The tank opening is pretty small so its challenging but with some effort you can make it happen. I routed the foam hose all the way to the back of the sprayer and attached it to the spray boom arms. I didn't like it there. It just looked too cluttered for me. Not acceptable! Lets make a boom entirely for the foam marker.
Step Five: Custom Boom The only place appropriate for the foam marker boom was on the front of the sprayer. I took some scrap metal, made a few cuts, then over to the vice for few bends and cranked out a pair of boom arms. I very much based them on the rear booms - just scaled them to size. I wanted the foam arms to be fold-able in the same manner as the existing ones. This would require a little engineering and trial and error but i'm up for the task. I located two tension springs and pins laying around the shop. I welded a couple pivot arms on the booms, welded a nut on the backside to hold the tension spring in place and drilled a hole down through the middle. Just like that, fold-able boom arms. Don't be fooled, it took a little more effort than that but you get the idea. I attached a 3/8 inch piece of hose to the shank hose connector straight up to a 3/8 inch barbed tee fitting. From there a piece of hose to a 90 degrees barbed fitting on the end of the boom. All I need is some power and this baby is done!
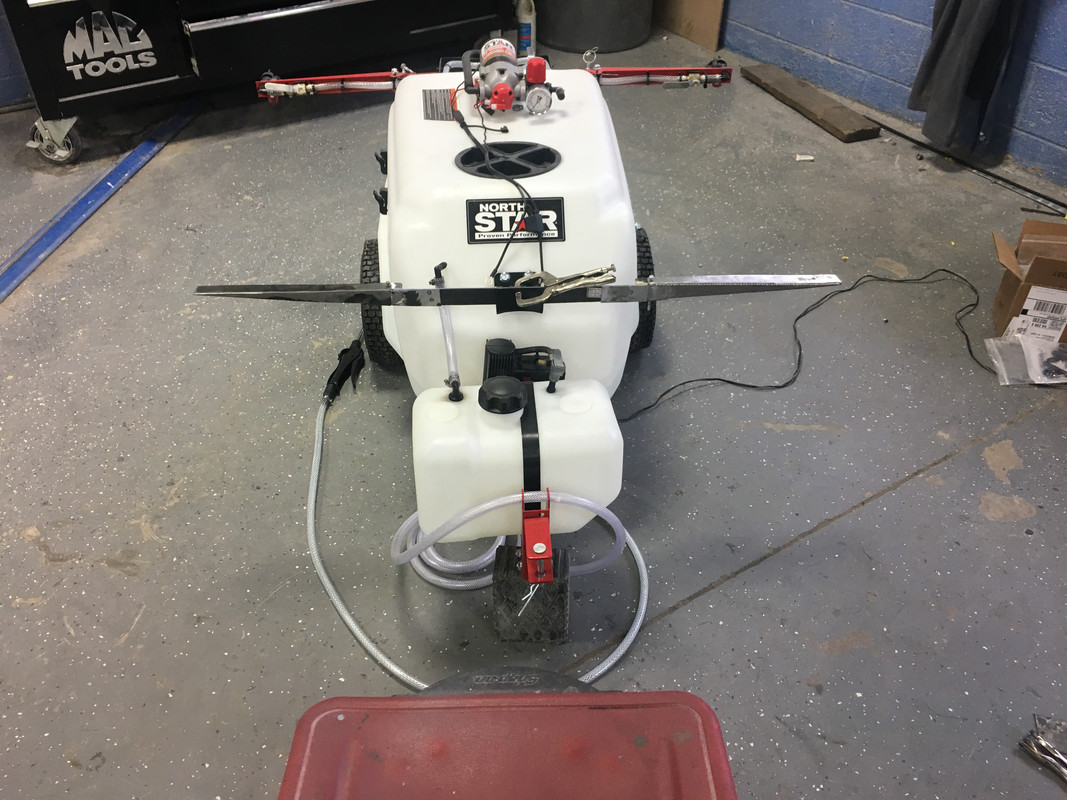
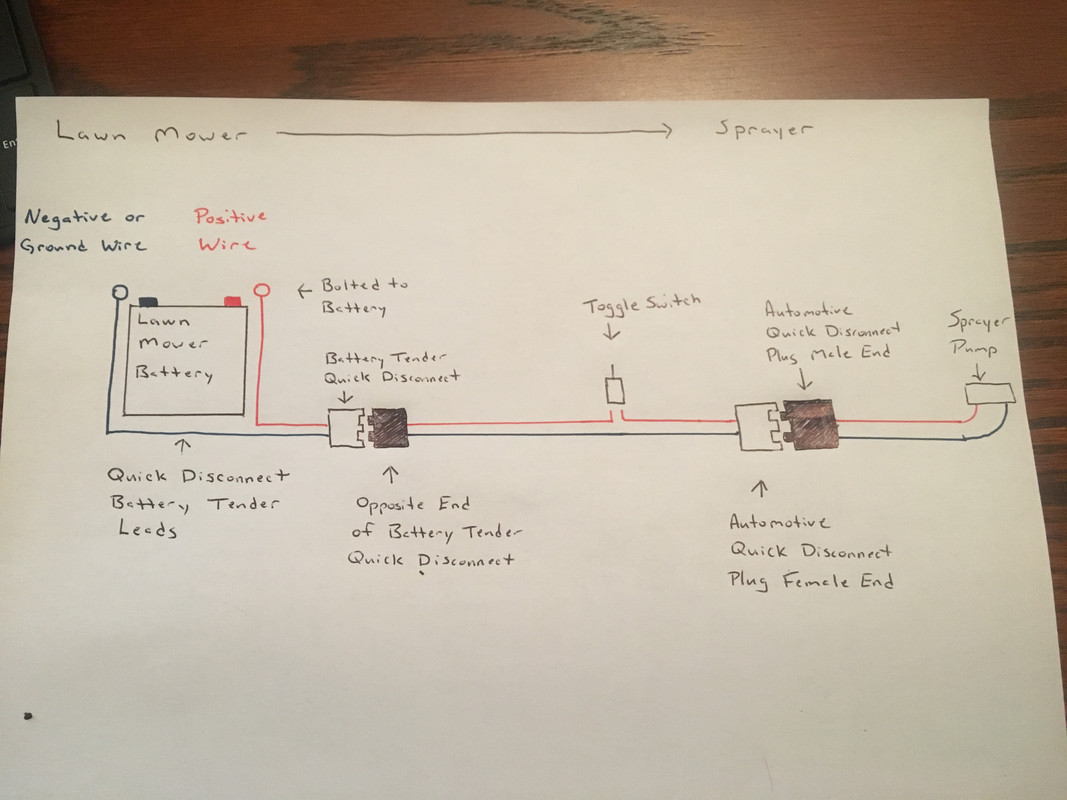
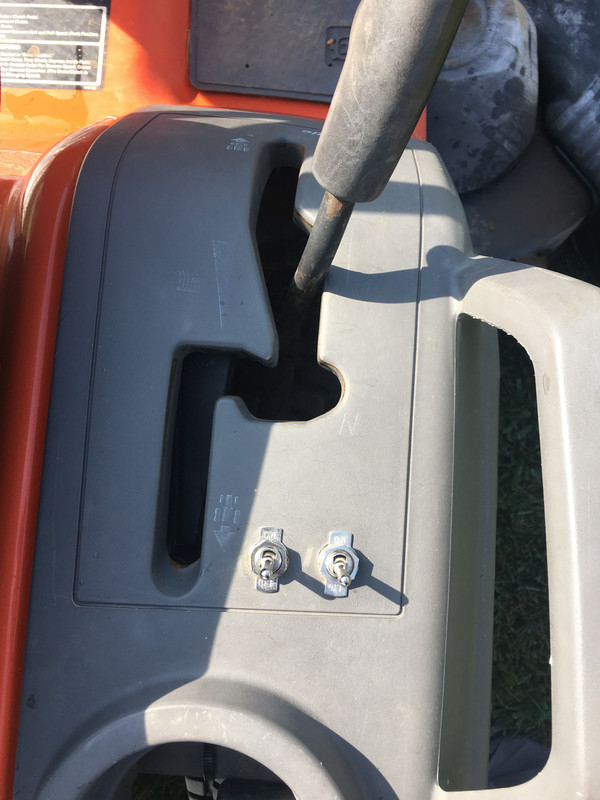
Step Six: Toggle Switches On the trailer sprayer I wired two automotive quick disconnect plugs. One for the sprayer pump, and one for the foam pump. On the lawn mower side I also wired two quick disconnect plugs. This would allow me to easily connect and disconnect the sprayer. No wires to unroll and hook up. No alligator clamps to connect to the battery. I wanted reliable power to the sprayer and this accomplished that. I mounted two toggle switches on the right side of the lawn mower and wired them directly to the battery. Now with the flip of a switch I can conveniently turn on and off both sprayer pumps.
My goal with these upgrades was to improve an entry level sprayer to make it function better and spray more precisely. I wanted to do it in a manner in which the overall look of the sprayer remained factory just with a lawn forum touch. I spent a decent amount of time trimming, and adjusting to make everything fit properly. Neat, clean, and simple! Looking at the receipts, I spent approximately $150.00 in total upgrades. All and all I would say these are very affordable modifications and you're getting plenty of bang for your buck. I had a lot of fun building it and i'm more than willing to answer any questions anyone out there has. Looking at the sprayer now, I can't help but smile and grunt exactly like Tim the tool man Taylor would do. :thumbup:
Step One: Shut Off Valve The plastic dinky shut off valves that come on the sprayer required entirely too much effort to open and close. The lever to operate the valve was way to small and hard to get a grip on. Not to mention, the valves looked like they would fall apart if you sneezed on them. I chose to replace them with a 1/2 inch pex ball valve made by Sharkbite, available at any big box store. These valves seemed substantial equipped with an appropriate sized handle. With enough force and I do mean force, you could get the factory 3/8 inch hose to seat on the 1/2 pex barbed fitting. While I was at it, I decided to add a third shut off valve immediately after the pump. This would allow me to turn the boom completely off, utilizing the by pass regulator for tank agitation.
Step Two: TeeJet Upgrade I honestly didn't give the factory spray nozzles on the Northstar a chance. To me it wasn't worth trying to familiarize myself with a new spray pattern and output. I use TeeJet nozzles on my Sprayers Plus backpack, I'm familiar with their spray tips and nozzle bodies. They make an exceptional product backed up by an equally incredible performance chart. Following their 20 inch on center spray tip spacing recommendation, I knew I needed to add a third spray tip in the center of the sprayer. The only issue here being there is no place to mount a third spray nozzle body assembly. I needed to modify the sprayer but I didn't want to lose the factory appearance.
Step Two B: "Boom Extension" I decided to build a boom extension that would span the gap between the two independent spray boom arms. This way the outside boom arms are still fold-able and function as they should. I built the boom extension using a piece of 1 inch wide by 3 foot long metal flat stock. I wanted to offset the middle nozzle so the spray from this tip wouldn't collide with the spray from the adjacent tips. I decided a three inch offset would suffice. A few quick measurements, a couple relief cuts on the back side and a vice for clamping and bending is all it took. Shazam a boom extension! I selected a hose shank nozzle body with triple connection to add the third spray tip. From there, a TeeJet 11/16 inch thread adapter. I needed to turn the orientation 90 degrees downward, I accomplished this using a TeeJet 90 degree elbow adapter. And to finish off the equation, an Air Induction TeeJet Flat Tip enclosed by TeeJet quick Cap and Seat Gasket. I bought a few different tips and cap combos (XR11004VP, XRC1104VP & XRC11006VP). This gives me the flexibility to adjust spray volume up or down, and adjust droplet size in order to control drift. For the two outside spray nozzles everything is the same, it just starts with a TeeJet Shank Hose connection instead of the triple shank used in the middle.
Step Three: Hose Clamps Over the years I have developed a hatred for hose clamps. They function perfectly well, they just look unsightly to me. I had to get rid of them. I decided to replace every single one of them with 1/2 inch pex crimp ring. Nothing significant here but I sleep better at night knowing I don't have any hose clamps on my sprayer.
Step Four: Foam Marker Could I use the tires of the lawn mower and the stripes in the grass to monitor where I have sprayed? Probably so, but I like to be a little more precise than that. Lets outfit this sprayer with a foam marker. After a few measurements and calculations, I located a 2.5 gallon tank on usplastic.com. Two things to note here, one being the tank doesn't come with a cap so you'll have to order that separately, come on guys really, but alright. Two, they offer a metal mounting strap as an accessory, makes securing the tank super easy so i'll give them a pat on the back for that. The tank fits rather well on the tongue of the sprayer located directly in front of the 31 gallon tank. I simply drilled and tapped a couple of holes and mounted it. I had a mini air compressor that came in a roadside emergency kit, this should work perfectly as an air source. I mounted that on a bracket between the foam marker tank and the sprayer tank. To connect the air compressor to the tank I used a basic valve stem. I drilled an appropriately sized hole and pulled the valve stem through from the inside of the tank. Before seating the valve stem in the tank, you must attach a piece of hose to get the air from the valve stem down into the water at the bottom of the tank. I just used a piece of windshield washer hose that I had laying around, any small pipe or tubing will work though. Lastly, to get the soapy foam out, I used the same TeeJet Shank hose connection that I used for the sprayer boom arms. This is probably the trickiest part because you have to thread the nut on the hose shank after its inserted into the tank. The tank opening is pretty small so its challenging but with some effort you can make it happen. I routed the foam hose all the way to the back of the sprayer and attached it to the spray boom arms. I didn't like it there. It just looked too cluttered for me. Not acceptable! Lets make a boom entirely for the foam marker.
Step Five: Custom Boom The only place appropriate for the foam marker boom was on the front of the sprayer. I took some scrap metal, made a few cuts, then over to the vice for few bends and cranked out a pair of boom arms. I very much based them on the rear booms - just scaled them to size. I wanted the foam arms to be fold-able in the same manner as the existing ones. This would require a little engineering and trial and error but i'm up for the task. I located two tension springs and pins laying around the shop. I welded a couple pivot arms on the booms, welded a nut on the backside to hold the tension spring in place and drilled a hole down through the middle. Just like that, fold-able boom arms. Don't be fooled, it took a little more effort than that but you get the idea. I attached a 3/8 inch piece of hose to the shank hose connector straight up to a 3/8 inch barbed tee fitting. From there a piece of hose to a 90 degrees barbed fitting on the end of the boom. All I need is some power and this baby is done!
Step Six: Toggle Switches On the trailer sprayer I wired two automotive quick disconnect plugs. One for the sprayer pump, and one for the foam pump. On the lawn mower side I also wired two quick disconnect plugs. This would allow me to easily connect and disconnect the sprayer. No wires to unroll and hook up. No alligator clamps to connect to the battery. I wanted reliable power to the sprayer and this accomplished that. I mounted two toggle switches on the right side of the lawn mower and wired them directly to the battery. Now with the flip of a switch I can conveniently turn on and off both sprayer pumps.
My goal with these upgrades was to improve an entry level sprayer to make it function better and spray more precisely. I wanted to do it in a manner in which the overall look of the sprayer remained factory just with a lawn forum touch. I spent a decent amount of time trimming, and adjusting to make everything fit properly. Neat, clean, and simple! Looking at the receipts, I spent approximately $150.00 in total upgrades. All and all I would say these are very affordable modifications and you're getting plenty of bang for your buck. I had a lot of fun building it and i'm more than willing to answer any questions anyone out there has. Looking at the sprayer now, I can't help but smile and grunt exactly like Tim the tool man Taylor would do. :thumbup: